This post will guide you on how to reset Epson L1110 using the epson adjustment program.
Is your Epson L1110 printer suddenly flashing a red or orange light, refusing to print, or displaying a dreaded “Service Required” or “Ink Pad is at the end of its service life” error? Don’t panic, and do not throw your printer away.
This is a very common issue. It doesn’t mean your printer is broken. It simply means the internal waste ink counter has reached its limit. The good news? You can fix this yourself using a piece of software called the Epson Adjustment Program (EAP) .
In this guide, I’ll walk you through exactly how to reset Epson L1110 safely and effectively.
Table of Contents
What is the Epson Adjustment Program?

Before we dive in, let’s understand what this tool does. The Epson Adjustment Program is a service utility (not an official Epson product for end-users) that allows you to:
- Read and Reset the Waste Ink Counter: This is the main reason you’re here. The program tells the printer “Okay, the pads are considered new again.”
- Perform Initial Ink Charging: Useful after a printhead replacement.
- Check Printer Status: See the current ink levels and counter values.
Important Warning: This is a powerful tool. Using it incorrectly can damage your printer’s settings. Follow these steps exactly.
What You’ll Need to Reset Epson L1110
- Your Epson L1110 Printer (turned on and connected via USB).
- A Windows Computer (The program is not natively compatible with Mac OS. You may need a virtual machine like Parallels or Boot Camp).
- The Epson Adjustment Program for the L1110. The printer uses the Epson L1110 Resetter, get it here: Epson Adjustment Program.
- A USB Cable (A standard printer USB cable).
- Admin Rights on your computer.
Purchase Epson L1110 Resetter Here
Step-by-Step Reset Guide to Reset Epson L1110
Let’s get your printer back to life.
Step 1: Prepare Your Printer
- Turn on your Epson L1110.
- Connect it to your computer using the USB cable. Do not use a Wi-Fi connection for this process; the program only works via a direct USB link.
- Load a few sheets of plain A4 paper into the rear feed slot. The program will need to print a status check at the end.
Step 2: Download and Run the Program
- Extract the downloaded ZIP file to a folder on your desktop.
- Right-click on the AdjProg.exe (or similar) file and select “Run as administrator” . This is crucial for the program to access your printer drivers.
- If you get a Windows Defender warning, click “More info” and then “Run anyway” . This is normal for third-party service tools.
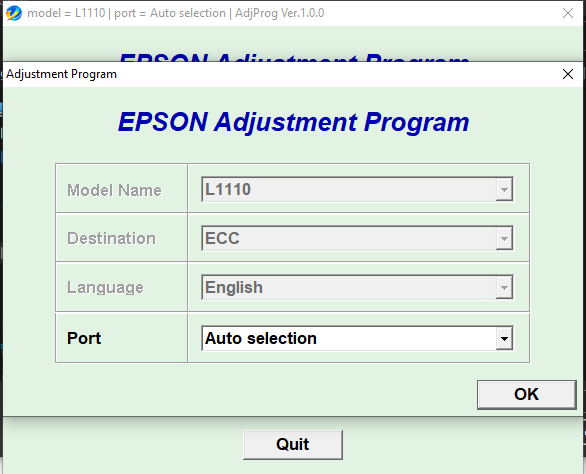
Step 3: Select Epson L1110
- The program window will open. You’ll see a dropdown menu labeled “Select” or “Model Name” .
- Choose “L1110 Series” from the list.
- Click the “OK” button.
Step 4: Enter Adjustment Mode (The Key Step)
This is where most people get stuck. The printer must be in a special “Maintenance Mode” for the program to communicate with it.
- In the main program window, click on the “Particular adjustment mode” button.
- A new window will pop up. Look for a dropdown menu and select “Waste Ink Pad Counter” .
- Click “OK” .
- Now, watch your printer. The program will send a command. The power light will start blinking. Wait for the blinking to stop and the light to become solid again. This means the printer is ready.
Step 5: Read and Reset the Counter
- Back in the main window, click the “Check” button (or “Read Counter”).
- The program will display a number (e.g., MC: 100% or PL: 100%). This is your waste ink counter. If it’s at 100% or above, you need to reset it.
- Click the “Initialize” button (or “Reset Counter”).
- A confirmation box will appear. Read it carefully. It will ask if you are sure you want to reset the counter. Click “OK” .
- The program will process. You should see the counter values drop back to 0%.
Step 6: Finalize and Print a Test Page
- Close the “Particular adjustment mode” window.
- You should be back at the main program window.
- Click the “Test Print” or “Print Check Pattern” button.
- The printer will whir to life and print a status sheet. This confirms the reset was successful and your printer is working again.
- Close the Epson Adjustment Program.
- Turn your printer off and on again using the power button.
Troubleshooting Common Issues
- “Can’t find printer” / “Port not selected”: Make sure the printer is ON and connected via USB. Try a different USB port. Restart the program and your computer.
- Program freezes at “Enter Adjustment Mode”: Your printer might not be entering the mode correctly. Try turning the printer off, waiting 10 seconds, and turning it back on. Then, try Step 4 again.
- Error Code 000043 or similar: This usually means the program can’t communicate with the printer. Check your USB cable and drivers.
- The reset worked, but the error came back immediately: This is rare. It usually means the physical waste ink pads are completely saturated and leaking. You will need to open the printer and replace or clean the pads physically before resetting the counter
About The Author
Leave a Reply
You must be logged in to post a comment.